Reality Roost Dev Guide
This guide will help you get setup for Unity development in Reality Roost
Installing Unity
- Make a Unity account here if you don't have one already. Either your student or personal email works fine.
- Sign up for the Unity Student Plan here.
- Make sure you press the "Free Access: Post-Secondary" button, not the "Free Access: Secondary" one

- Make sure you press the "Free Access: Post-Secondary" button, not the "Free Access: Secondary" one
- Download Unity Hub from here. Unity Hub is Unity's management tool and launcher for Unity development.
- Open Unity Hub and sign in to your Unity account.
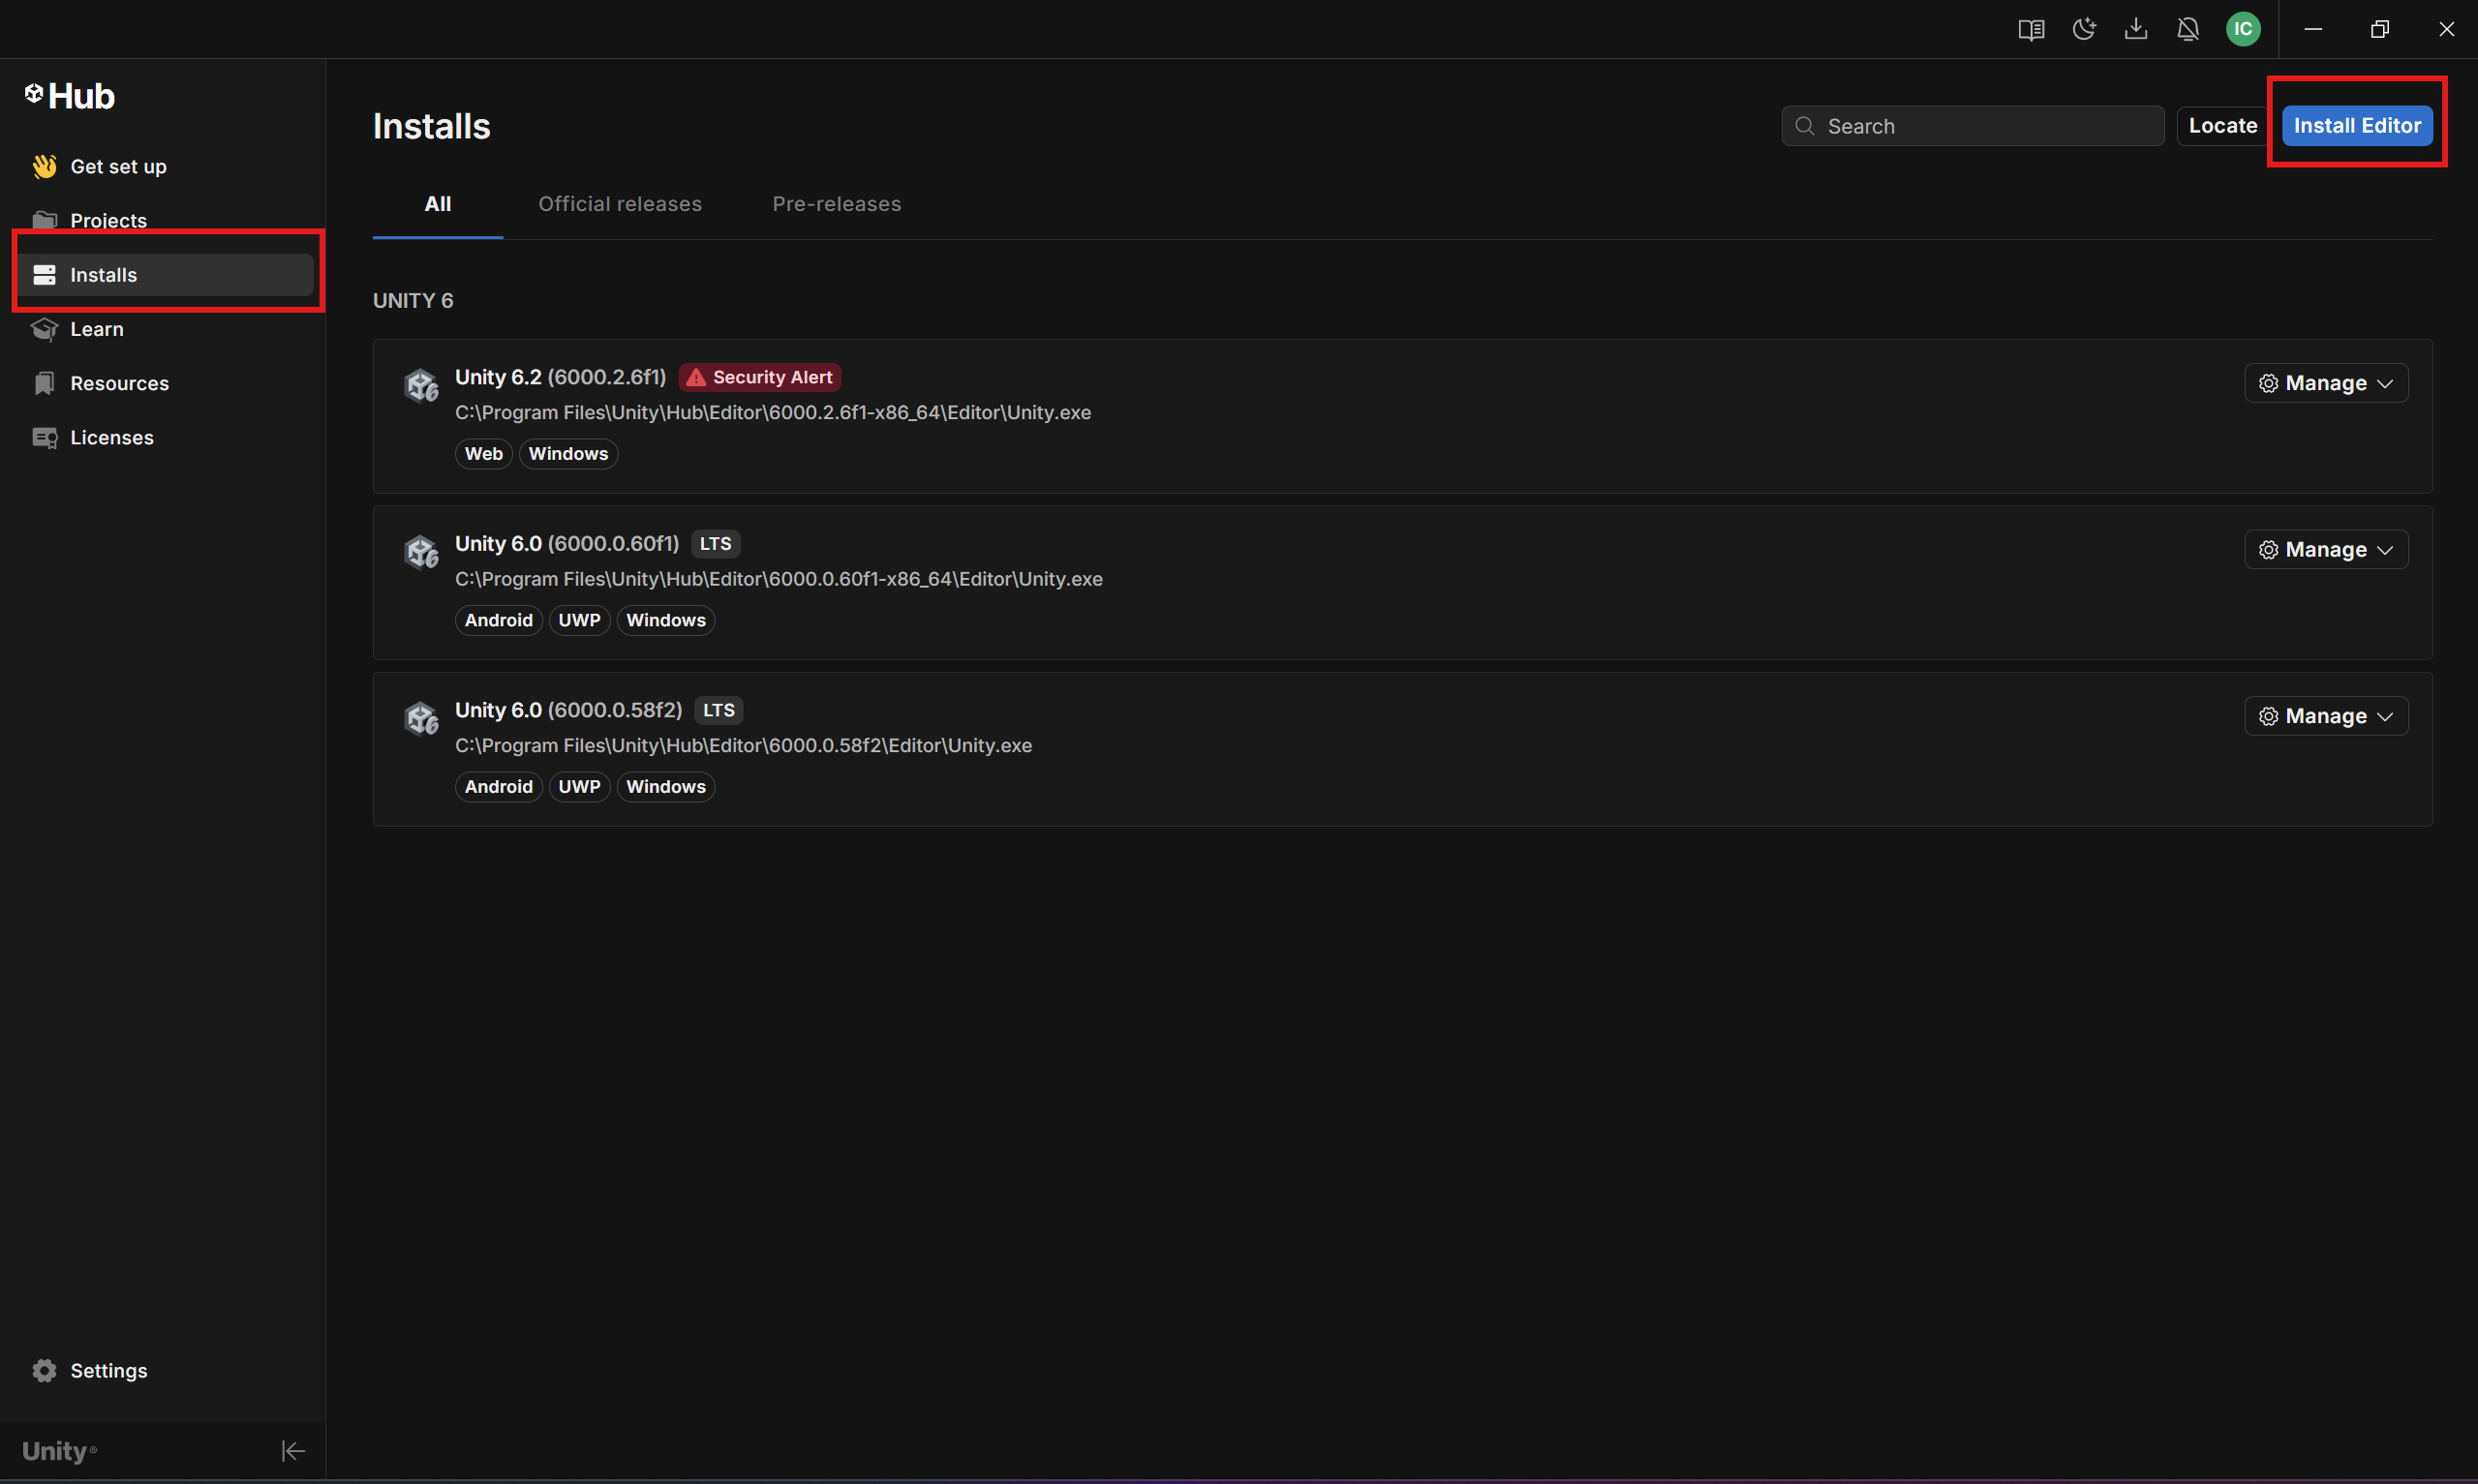
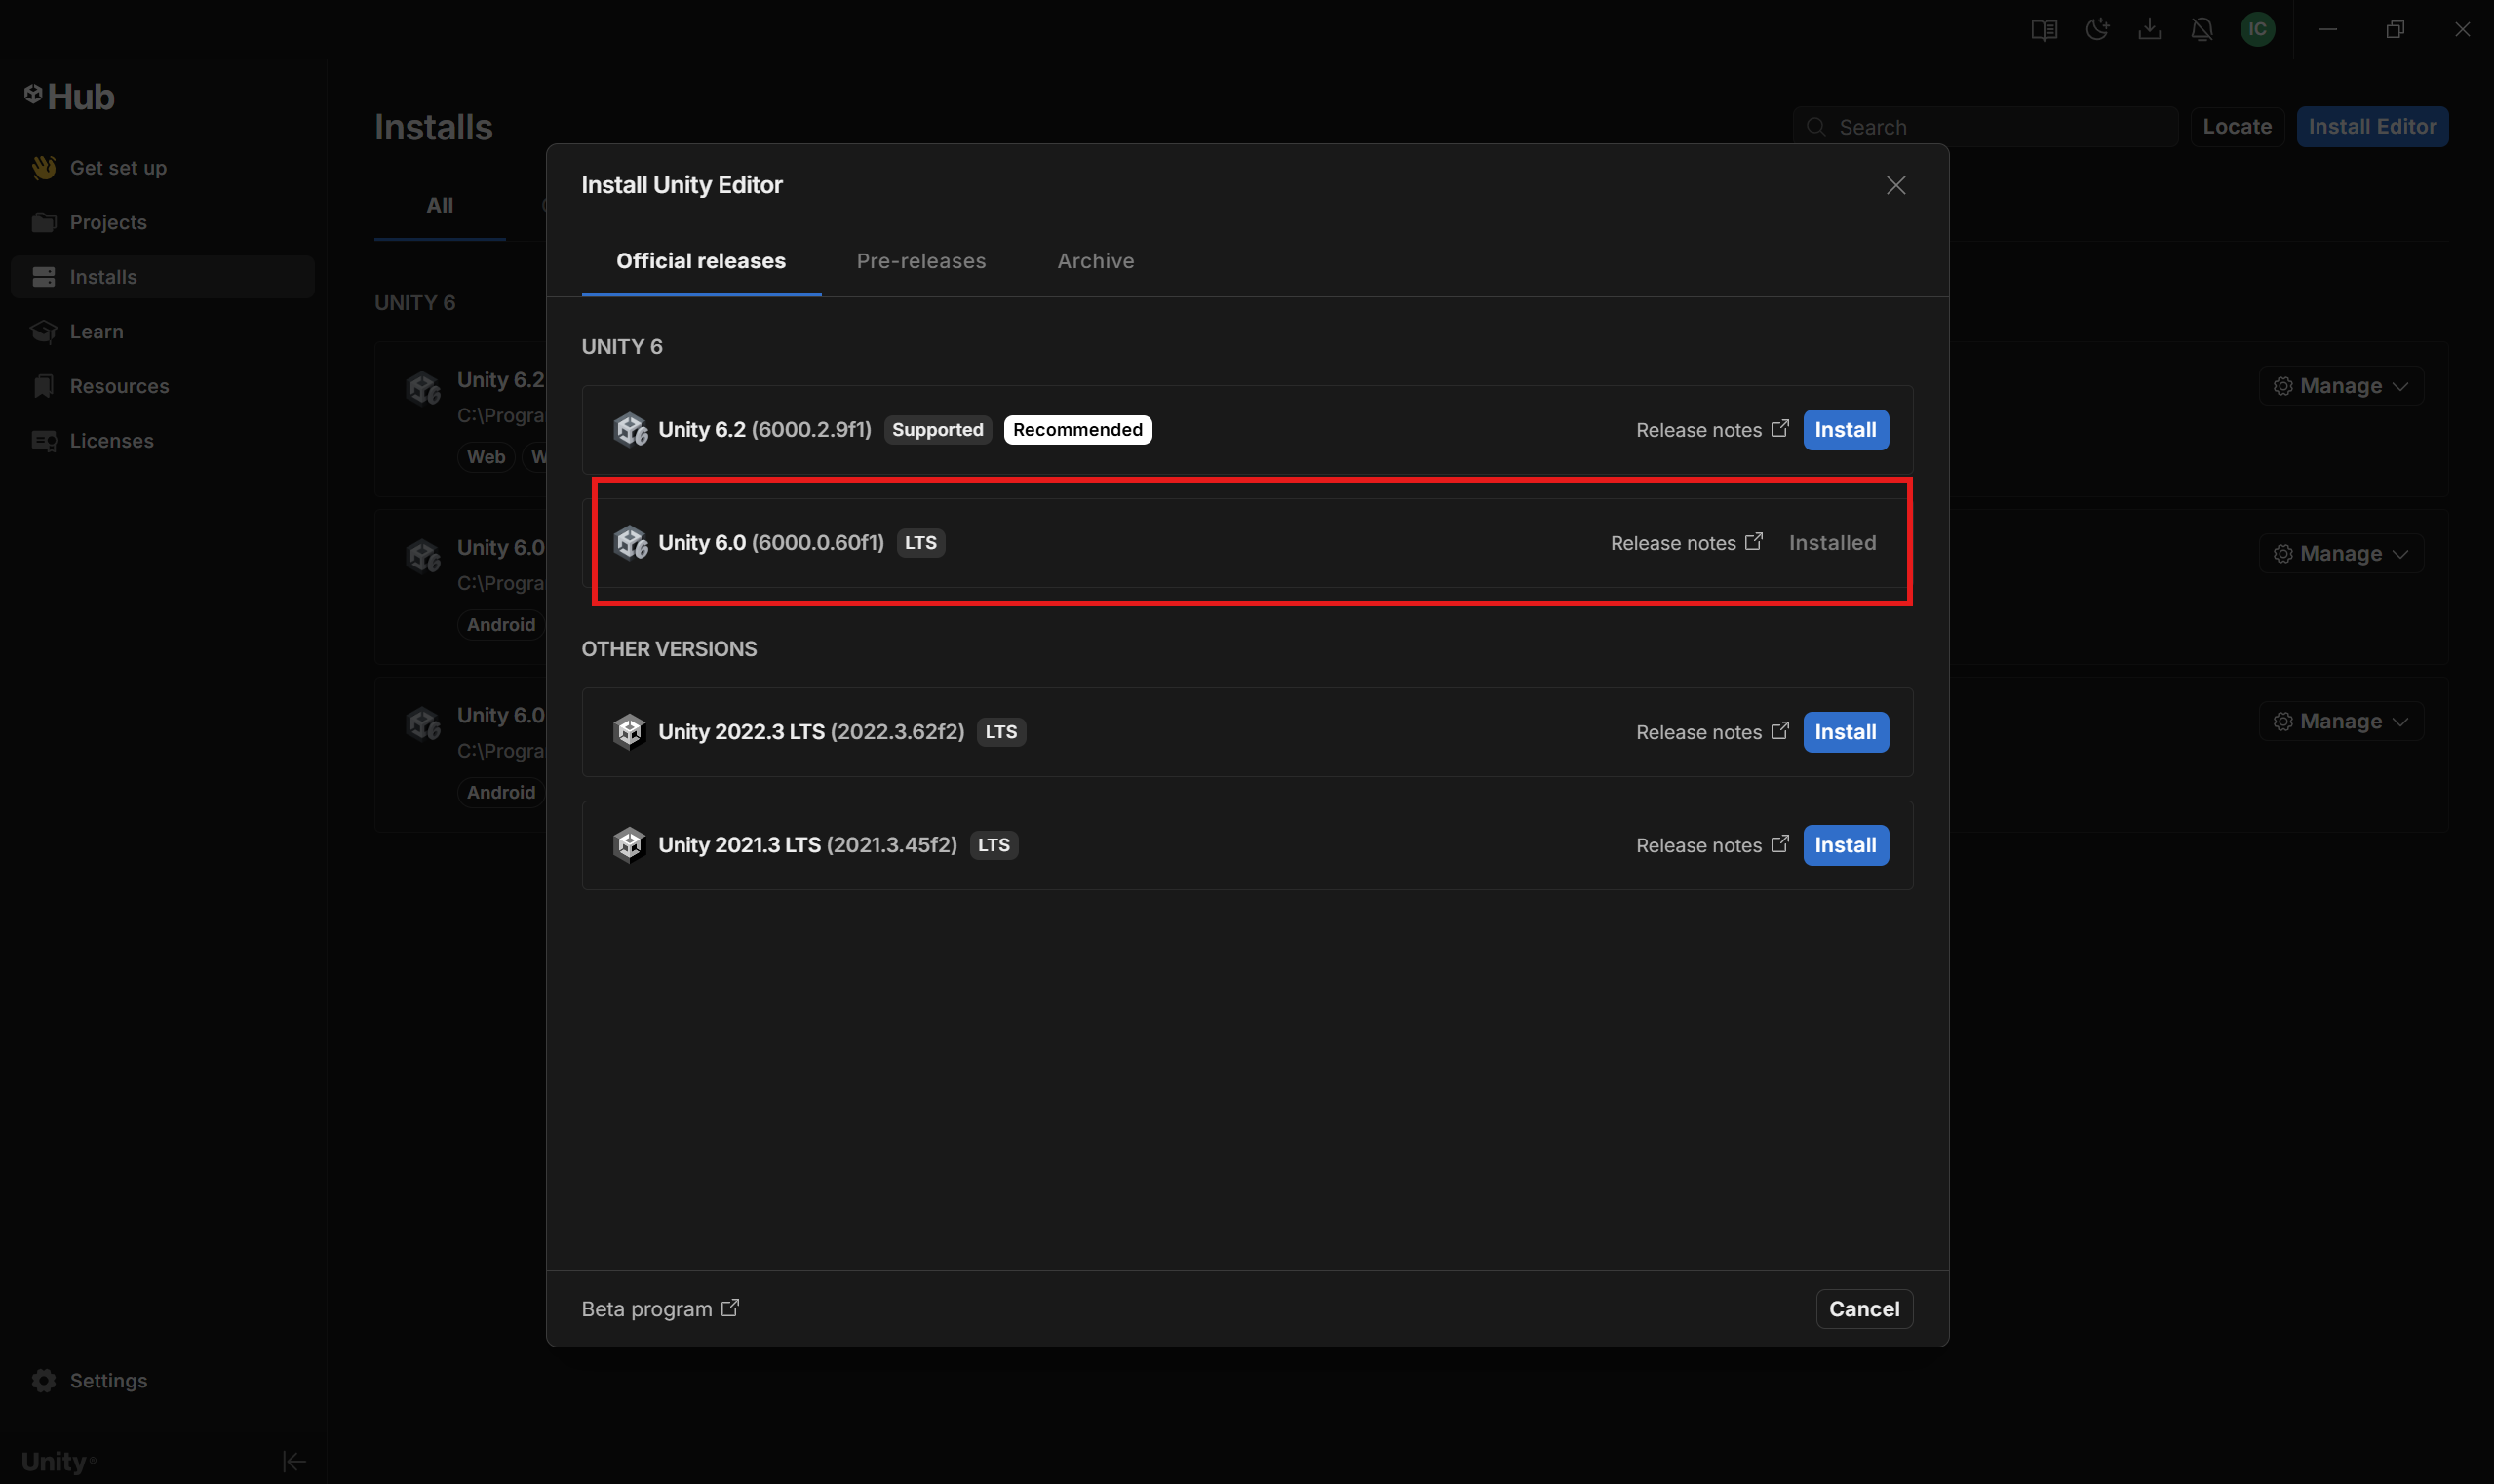
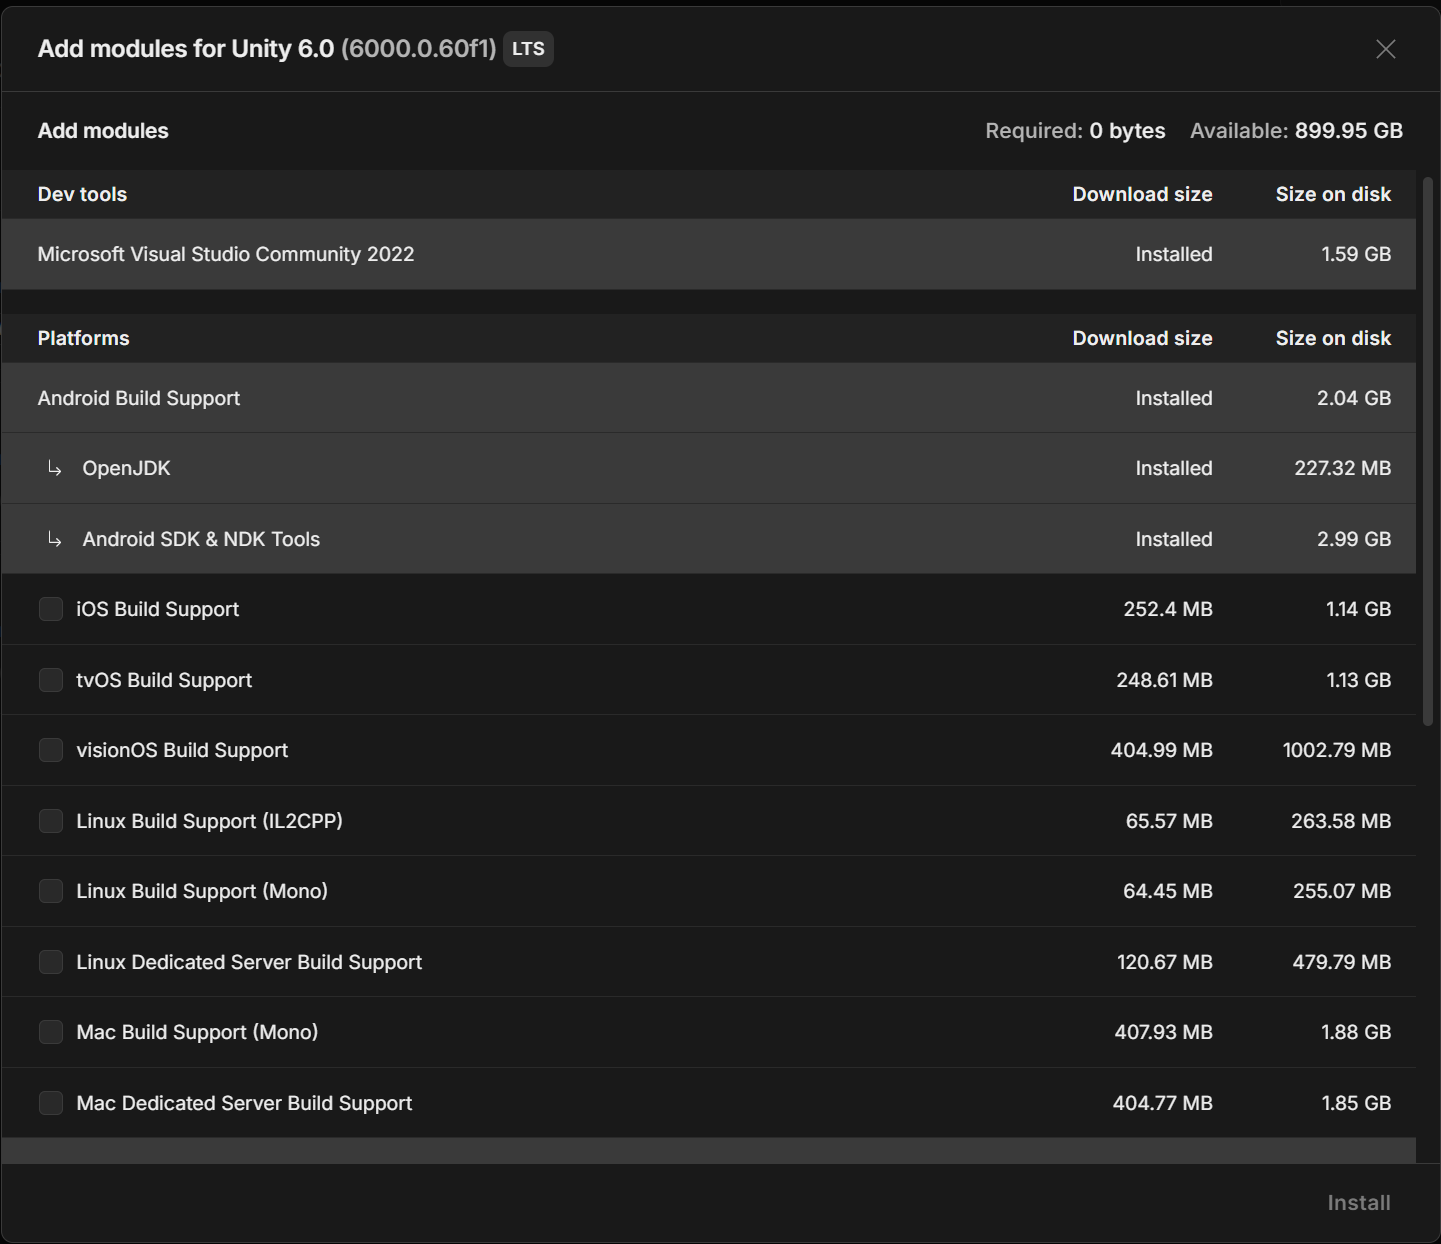
- Navigate to the Installs tab and click Install Editor. Install Unity 6000.0.60f1.

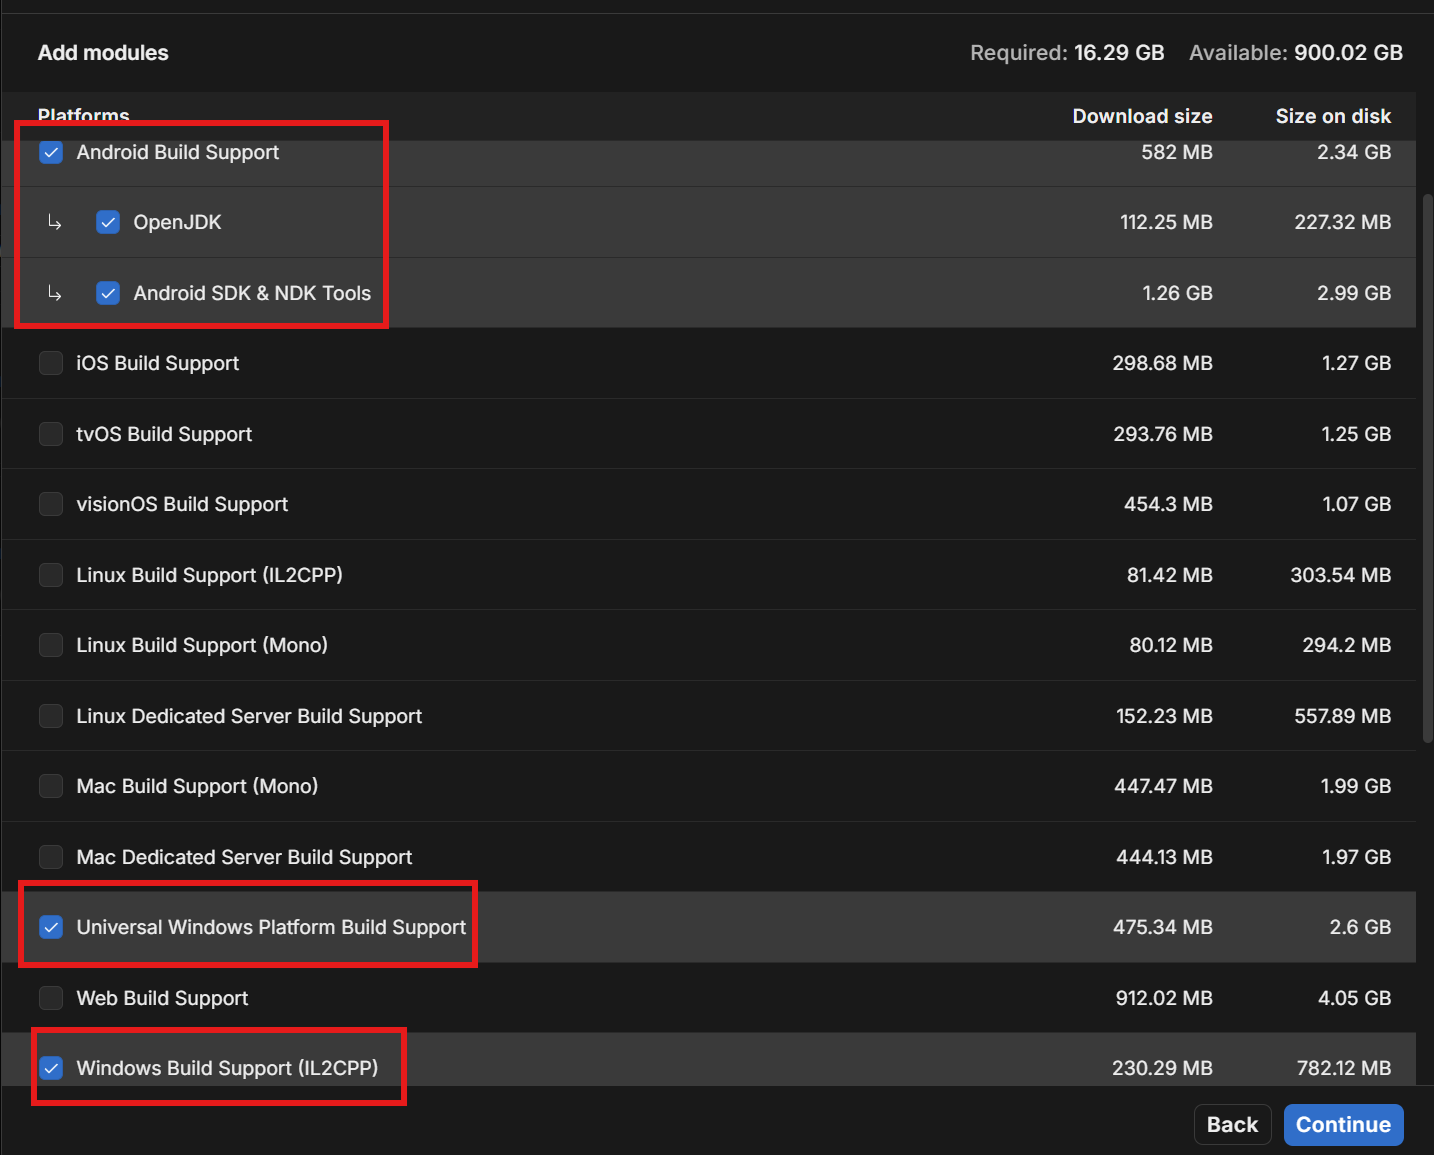
Select the following modules: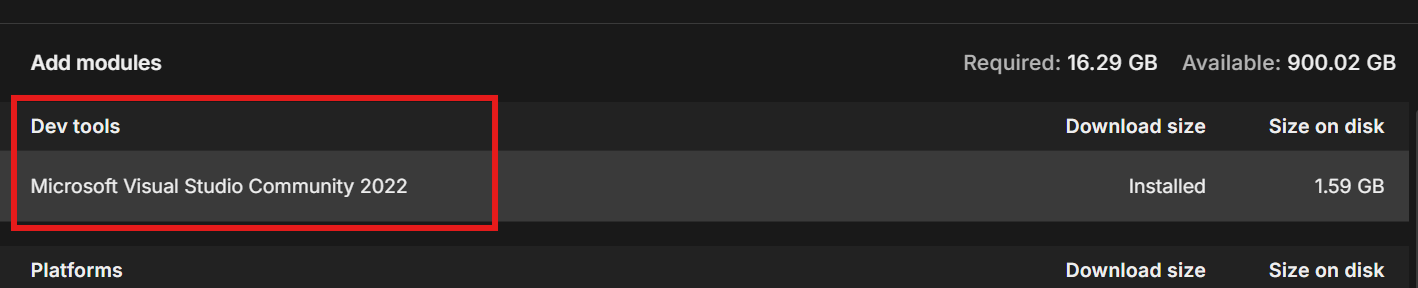
If you already have Unity 6.0.60f1 installed, but didn't install the above modules prior, you can add them to the existing installation.

- Wait for Unity Editor to install. This can take up to 20 minutes.
- Congratulations! Unity Hub, Unity Editor, and Visual Studio is now installed!
Unity Essentials
Unity Essentials is a course made by Unity designed to learn the basics of Unity. It takes a 2-3 hours to complete. If you haven't worked with Unity before, complete the course before working on Reality Roost!
I recommend you complete it in the Unity Editor (it will say this during the course), so you won't have to constantly switch between Unity and your browser. Text in the GroupMe or Zoom channel if you need help completing it!
Downloading RR Github repo
Prereqs
- Git: here
- Github Desktop: here
- Added as collaborator to the GitHub repo: ask Israel in GroupMe or Zoom
- Unity 6000.0.60f1 (done above)
Setting up repo locally
- Open GitHub Desktop
- Click the FIle button on top left. Then go to File>Clone Repository>URL and paste
https://github.com/Izzy129/reality-roost.git. Also select where you want to store the repository locally.- Quick rundown of the UI. Fetch origin before pushing your change to ensure it doesn't cause merge conflicts after you push.
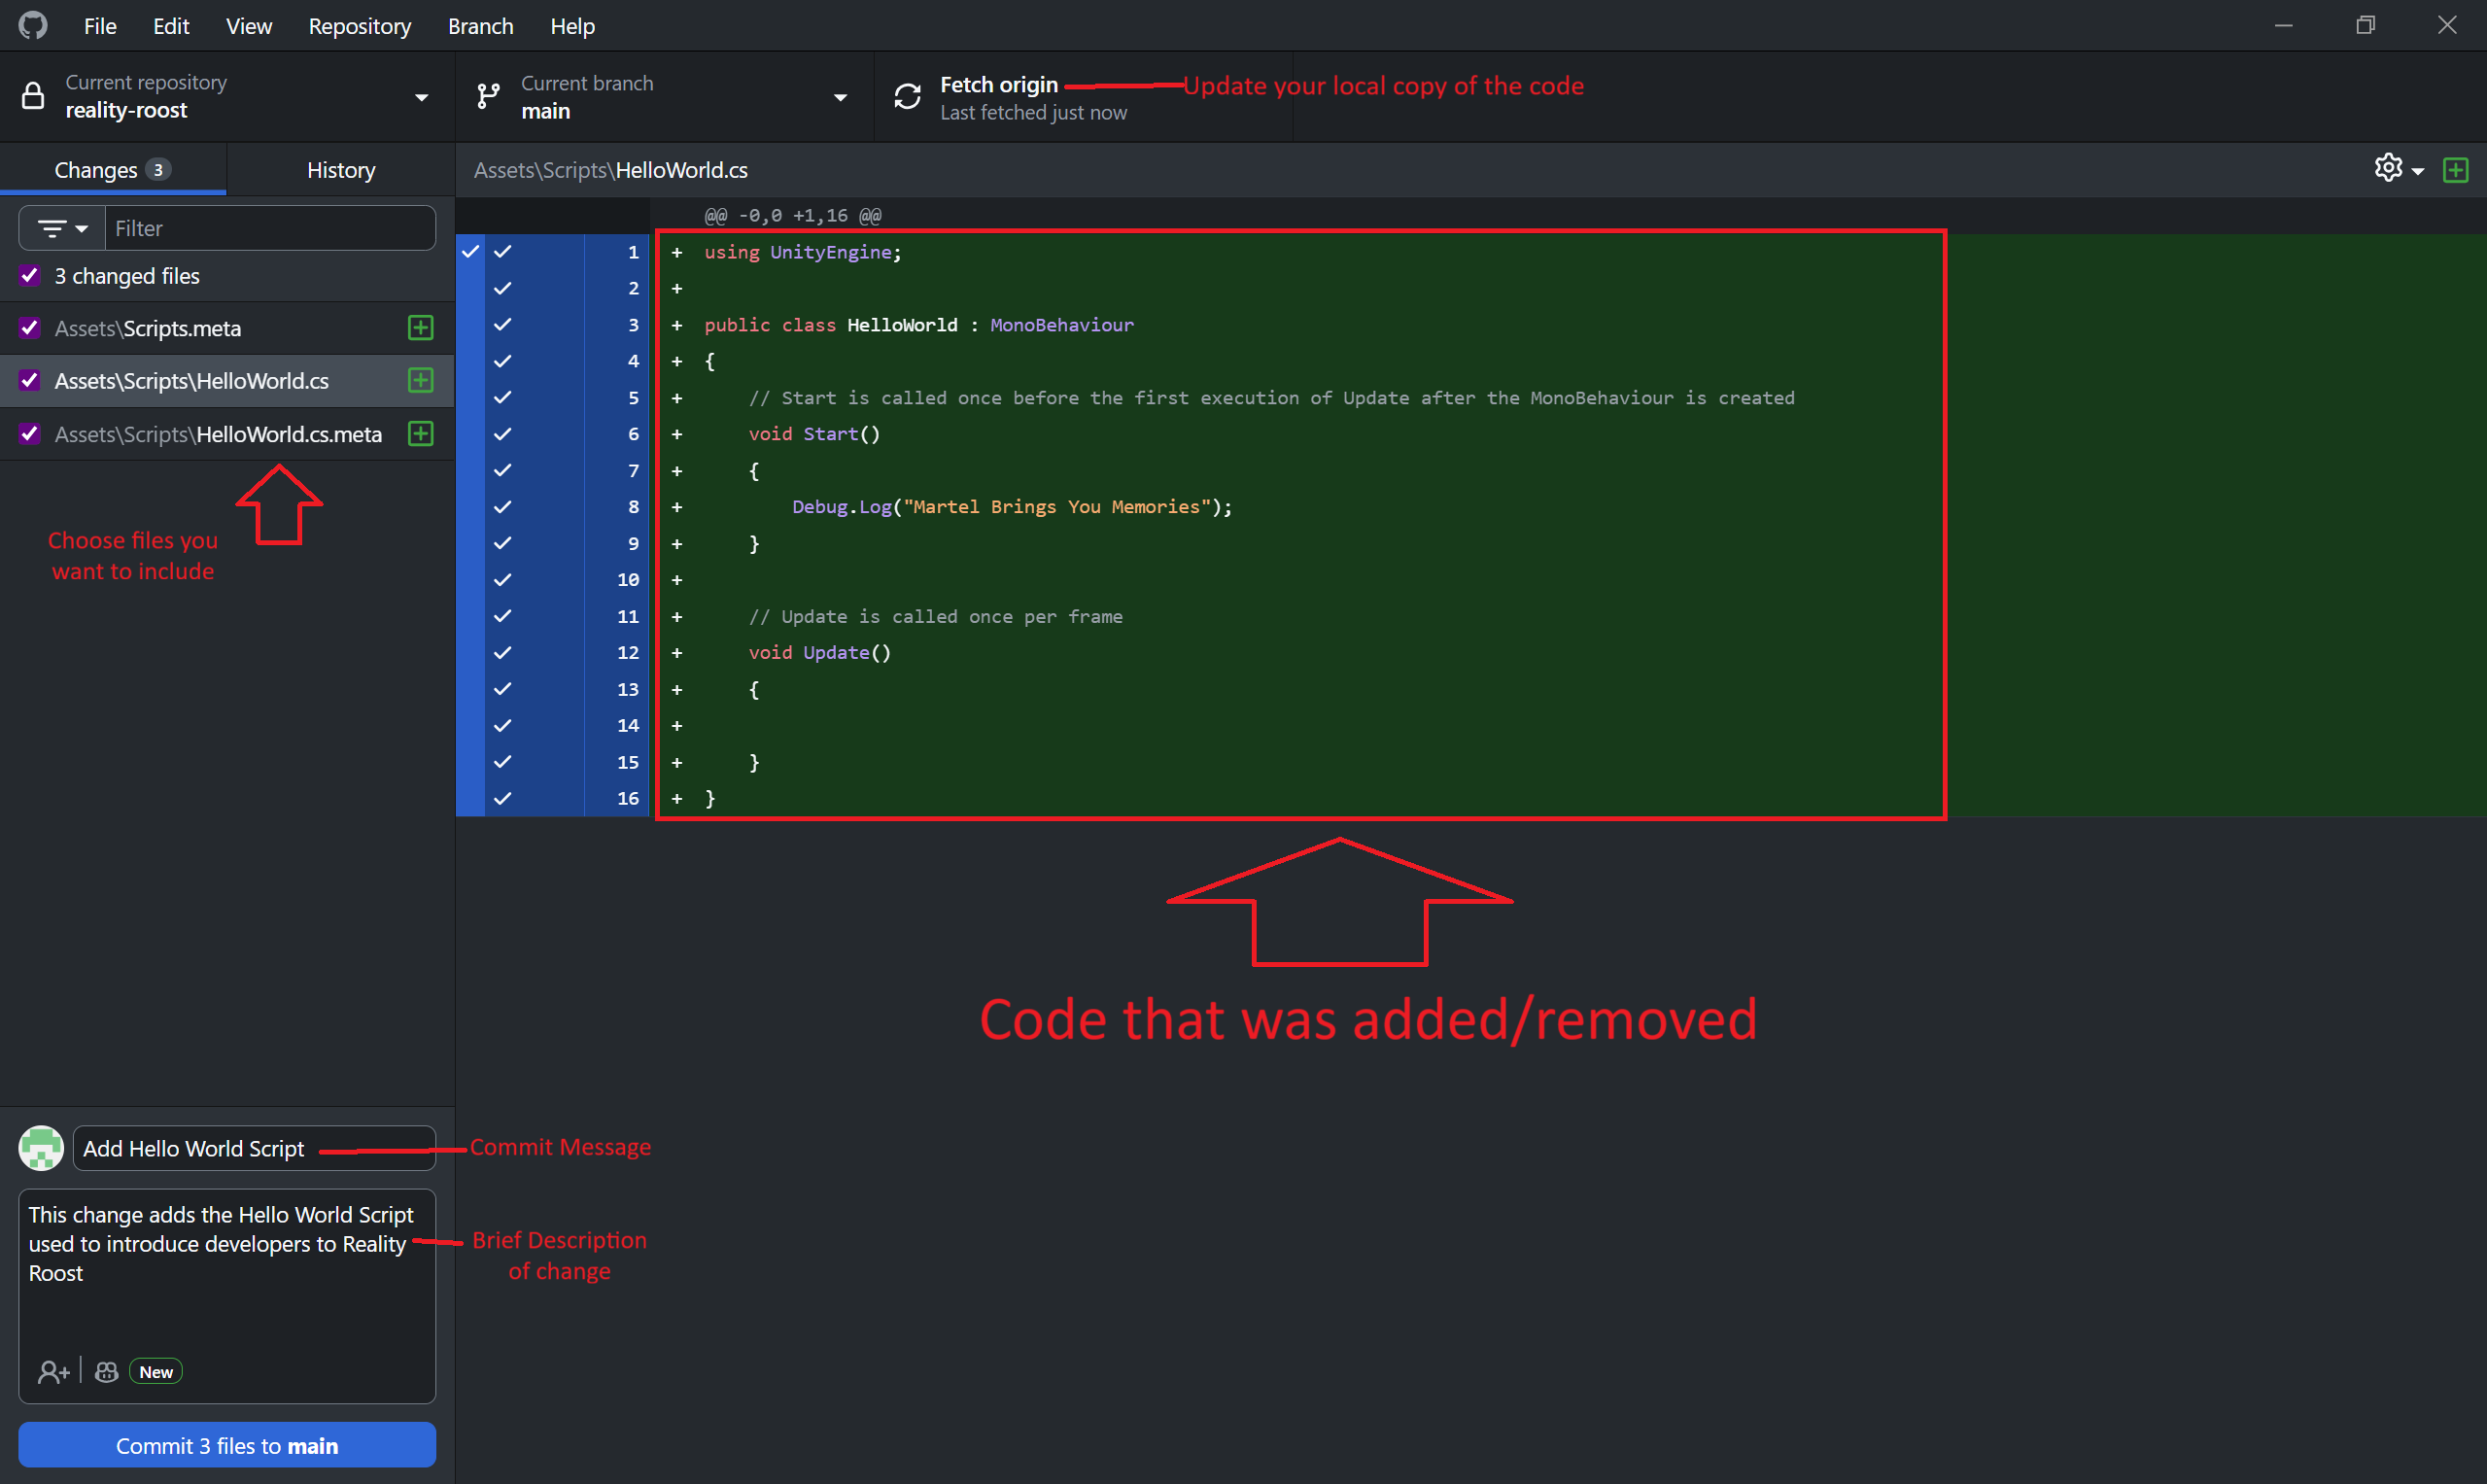
- Quick rundown of the UI. Fetch origin before pushing your change to ensure it doesn't cause merge conflicts after you push.
- Change your current branch to your team's branch (Haptics/Rumbling Floor team =
rumble-floor, Multiplayer Tracking/System Arch team =multiplayer-tracking). See branches for more details on branches.
- Open Unity Hub > Projects > Add > Add from Disk > Select wherever you cloned the repo

- Wait for Unity to setup the project, then open it.
- Ensure that you're using the Windows build profile, not the Android build profile.
- To check, go to File>Build Profiles, and check if Windows is active like below. If not, click the Windows build profile and click the Switch Platform button
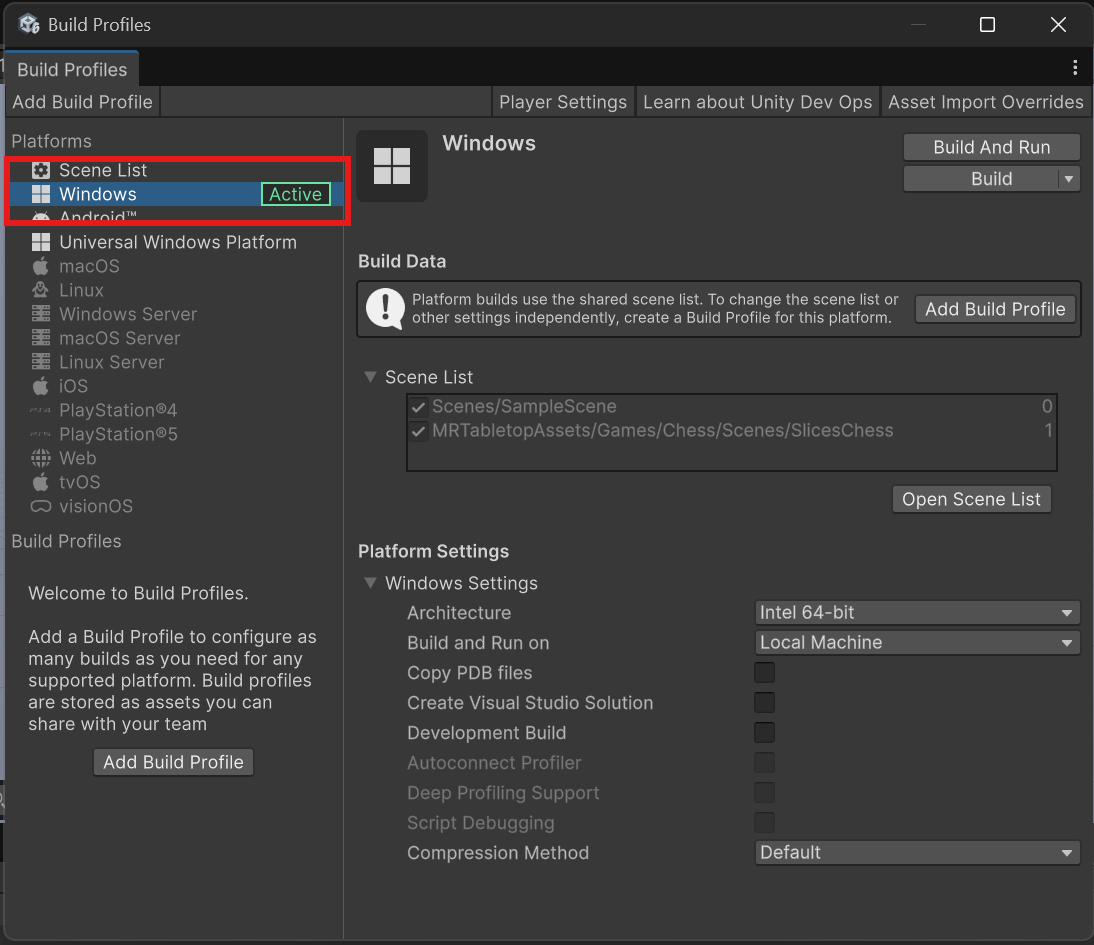
- To check, go to File>Build Profiles, and check if Windows is active like below. If not, click the Windows build profile and click the Switch Platform button
- Congratulations! You've successfully setup the Reality Roost project in Unity :D
- Check that all packages imported successfully
- Once Unity editor is open, go to Window>Package Manager>In Project and ensure that no packages have errors. If so contact Israel to fix this!!!
ALWAYS run git pull or pull from the GitHub GUI before opening the project in Unity again after the first-time setup!
This ensures you have the most up to date code.
Setting up UnityYAMLMerge (optional, but helpful)
Merge conflicts in Unity are a hassle to deal with. Thankfully, Unity provides a tool called UnityYAMLMerge that helps resolve these conflicts. You must set it up manually, since the location of the tool varies based on your machine.
I recommend setting it up now (makes potential merge conflicts easier later), but if you're having trouble setting it up, it is not required.
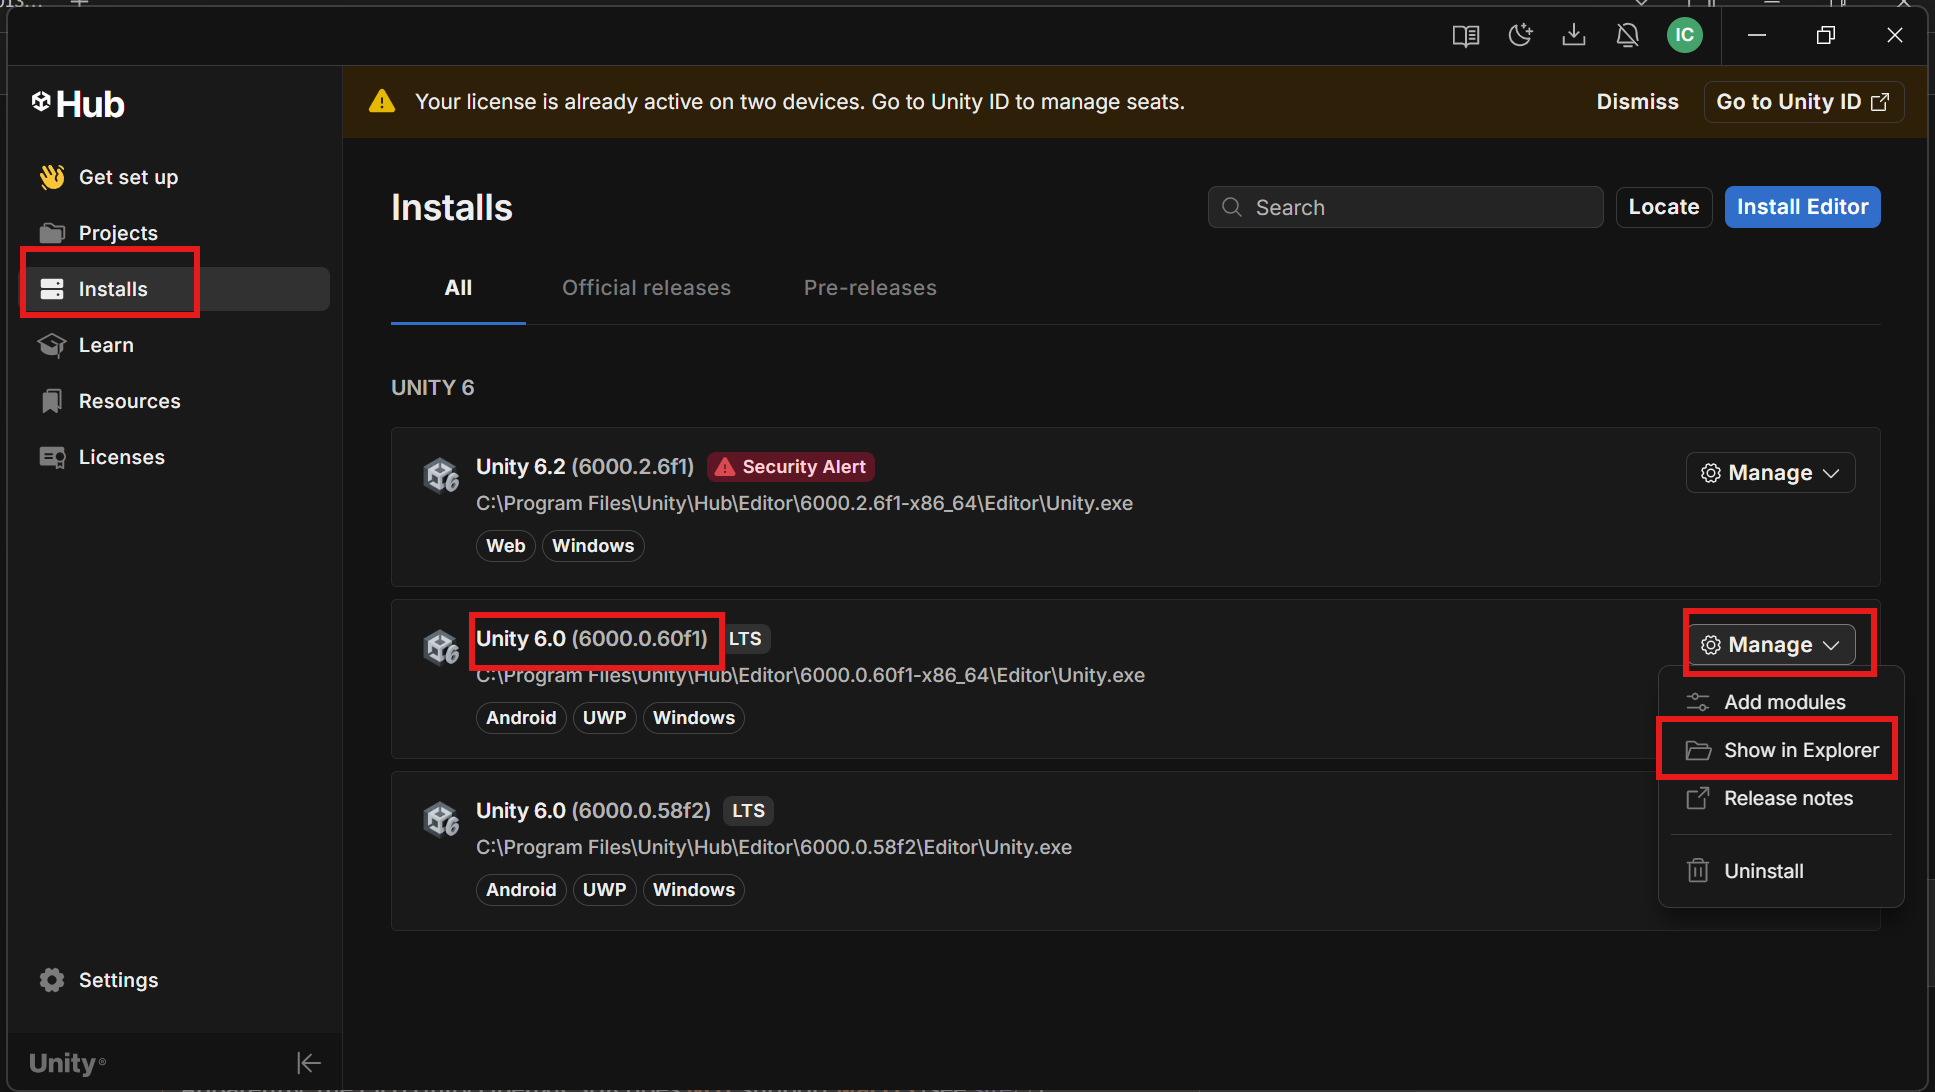
- Open Unity Hub, and go to the Installs tab. On the Unity 6000.0.60f1 install, press Manage>Show in Explorer.
- In the folder that pops up, go to the Data>Tools folder.
- Find the UnityYAMLMerge.exe file. Single press it, and press
CTRL+Shift+Cto copy the path to the executable. - With the path in your clipboard, go to the Reality Roost folder, and open the
.gitfolder..gitfolder not showingIf you don't see the
.gitfolder, then you haveShow Hidden Foldersdisabled in File Explorer. Enable it like so:

- In the
.gitfolder, edit theconfigfile (use notepad++ or notepad) and add the following lines. Replace<EDITED_PATH>with the path we copied earlier, edited like so:- Replace the double quotes in the pasted text with single quotes.
- Replace the backslashes (\) with forward slashes (/).
- Edited path Example:
"C:\Program Files\Unity\Hub\Editor\6000.0.60f1-x86_64\Editor\Data\Tools\UnityYAMLMerge.exe"
becomes
'C:/Program Files/Unity/Hub/Editor/6000.0.60f1-x86_64/Editor/Data/Tools/UnityYAMLMerge.exe'
Paste these lines in the bottom of ur git config:
[merge]
    tool = unityyamlmerge

[mergetool "unityyamlmerge"]
    trustExitCode = false
    cmd = <EDITED_PATH> merge -p "$BASE" "$REMOTE" "$LOCAL" "$MERGED"
- Example (on my machine):
...	stuff already in config...

[merge]
    tool = unityyamlmerge

[mergetool "unityyamlmerge"]
    trustExitCode = false
    cmd = 'C:/Program Files/Unity/Hub/Editor/6000.0.60f1-x86_64/Editor/Data/Tools/UnityYAMLMerge.exe' merge -p "$BASE" "$REMOTE" "$LOCAL" "$MERGED"
Meta Horizon Link + MQDH
Reality Roost will run using Meta Quest 3s headsets.
To use a headset on your computer (e.g., to test Reality Roost on a headset), you will need to install Meta Horizon Link. Note that this requires a somewhat powerful computer/laptop.
- If you don't have a compatible laptop/computer, you can use the lab computers in Duncan Hall room 2119. See instructions here (TODO) for lab computer usage
Follow the instructions on Meta site to connect headset to your computer and launch Link.
Once link is launched, change default OpenXR runtime to Oculus (TODO).
Then when you press Play in Unity editor, it will output to headset!
Development Workflow
You have successfully setup Reality Roost for local development!
For quick reference, below is a workflow for development
Workflow
- Choose your branch based on what team you're on
- If on rumbling floor team, ensure you're on the
rumble-floorbranch - If on multiplayer tracking team, ensure you're on the
multiplayer-trackingbranch - See active branches here
- If on rumbling floor team, ensure you're on the
- Pull the latest changes with
git pull(CLI) orFetch origin(GUI)- This should be done BEFORE YOU OPEN THE PROJECT IN UNITY
- but Unity will reload if you do it while it's open
- Do some work in Unity
- Add your changes to working tree
- Use
git add fileto addfileto your commit, orgit add .to add all changes. Or use GUI
- Use
- Confirm your changes are added with
git statusin CLI (or use GUI) - Commit your changes with
git commit -m "Commit Description"or with GUI - Push your changes to GitHub in GUI or in CLI:
git push
Making a new branch
Git branches allow you to diverge from the main branch to work on something without affecting everyone (e.g. a new feature, testing new things that could break the overall system, debugging, etc.).
We currently use git branches to separate work from Rumbling Floor team (rumble-floor branch), and Multiplayer Tracking team (multiplayer-tracking branch).
Then every 2 weeks we merge each other's work on the main branch (starting 2nd semester)
This ensures Reality Roost progress is synced up between the 2 teams.
Outside of team separation, I recommend using git branches for larger features.
Here's how to make a new branch from your current branch (either from rumble-floor or multiplayer-tracking branch)
- Make a new branch in GUI or with CLI:
git checkout -b my-branch - Do work and periodically commit changes with workflow above
- When ready to merge your changes to the main branch, switch back to main branch in GUI or with CLI:
git checkout main - Merge your changes to the main branch in GUI or in CLI:
git merge my-branch - Push merged changes in GUI or in CLI:
git push
Git is a very useful tool for software development. Here are some resources if wanna learn the fundamentals of git (not required here tho)
- https://missing.csail.mit.edu/2020/version-control/
- https://rogerdudler.github.io/git-guide/
- https://eagain.net/articles/git-for-computer-scientists/
- https://maciejb2k.github.io/no-bs-git/
- Plenty more online!
Handling Merge Conflicts
A merge conflict occurs when 2 developers change the same file, and Git gets confused on which version to accept (especially if you modified the same lines of code). Git does its best to resolve these automatically, but you may need to resolve it manually.
- Try using Unity's merge tool first:
git mergetool - If that doesn't work, see which files conflict with
git status - Manually resolve the conflicts
- If not a scene file → merge manually in GitHub GUI or a text editor (plenty of resources online for this)
- if it's a conflict in a scene file, and unityYAMLMerge couldn't merge it, you must merge it manually in Unity
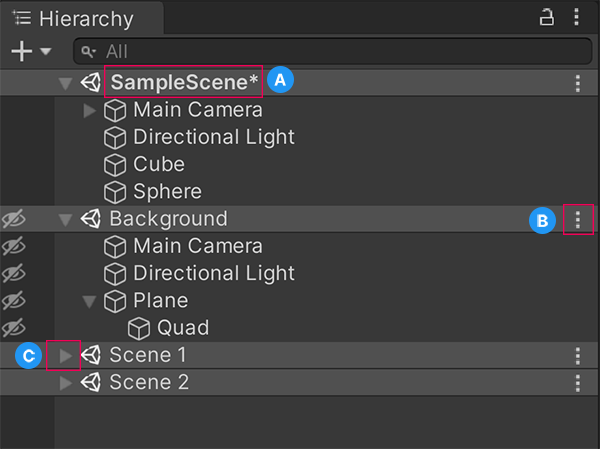
- Let's say you have a scene
Scene.unitythat won't get pulled from remote branch because of a merge conflict. Let's fix that. - Make a copy of your current local scene file (name it like
Scene_local.unity) - Try pulling remote version now (will download as
Scene.unity) - Open both scenes in Unity (kinda something like below)
 → see docs
- Manually go through each GameObject to see what was added or removed or changed. Choose whether to add or remove said change in the
Scene.unityfile. - After manually merging like so, delete
Scene_local.unity, and commit changes onScene.unityand push to remote
- Let's say you have a scene
More Git Stuff
- Packages installed from the Unity Package Manager are added to the
Packages/manifest.jsonfile. Then, when a developer pulls from Github, only themanifest.jsonis downloaded. Unity automatically installs packages listed inmanifest.json.- However, if you install a custom package (e.g. in
Assetsfolder; likely by doingAssets → Import Package → Custom Packageor downloaded from theAsset Store), you will need to commit them manually. *TODO add instructions for committing package assets manually
- However, if you install a custom package (e.g. in